Mix A Track With Me: Part 1 - Core Mix Techniques
In this article, I am going to cover the core mix techniques I use every day that are ultimately transferable over genres (and DAWs).


Hey, my name’s Sky.
I’m a recording and mixing engineer based in Birmingham, UK. Today I’m going to walk you through how I would go about mixing a track (in Logic Pro).
In this article, I am going to cover the core mix techniques I use every day that are ultimately transferable over genres (and DAWs).
And in part two, we will go in-depth into some creative mix techniques that are sure to make your mixes stand out from the crowd.
Mix Preparation
Mix preparation makes the mix process go way smoother. The first thing I do is check that the tempo and file name are correct.
Then I make sure to make a session file copy.
(Go to ‘file’ and then ‘Save a copy as’).
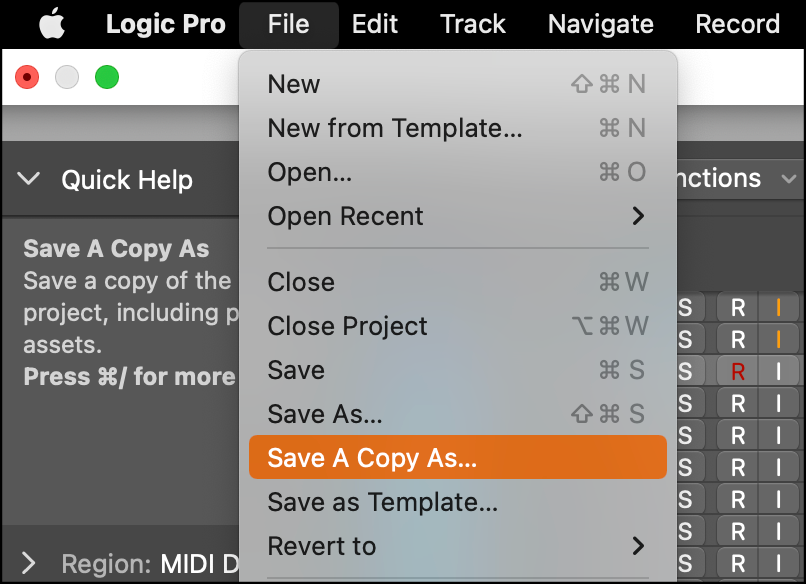
This makes it much easier to go back and hear what changes you have made and whether they are for the better or worse.
Mix prep also involves removing any unwanted noises and silence.
You may not notice things such as mouth noises in the mix now, but once you start compressing the audio they will become noticeable.

Tip: When cutting audio, always remember to cut on zero-crossing to make sure there are no clipping sounds and use the fade tool to make transitions smooth.
Navigation
Being able to navigate around my session efficiently is important when it comes to my mixing as it saves me a lot of time.
This is why I always use song section markers and colour coding on instruments. It makes it much easier to identify each audio source and where each section of the song begins and ends.

Tip: Always colour code your tracks the same, ie Bass is always Purple, Vocals are Red and Guitars are Green.
Gain Staging
Gain staging is the act of making sure levels are correct at every stage of the audio signal chain.
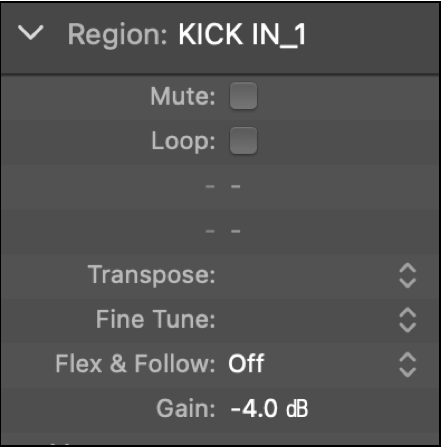
For example, I decreased the gain of both the in and out kick drum mics by -4db as they were both peaking into the red.
I did this as it prevents plugins from overloading and helps make sure the final mix isn’t peaking.
Tip: Don’t get too hung up on this, we ultimately just have to make sure that our mix is not going to overload the mix bus.
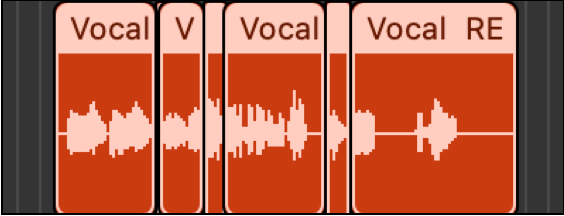
I also cut up the vocal and turned the gain of the sections up or down to make the volume more consistent across the whole take.
This makes it easier for the compressor to compress the audio.
Tip: Use a level metre - I balance the bass and the vocals at around 30 RMS and then balance the other instruments in relation to that, making sure my mix doesn’t go above -6 peak. This makes sure we always have enough headroom.
Equaliser (EQ)
The first form of equalisation I use is filtering.
This is the act of using an EQ to remove unwanted frequencies from the low or high end of an audio source, using a high or low pass filter.
Soft Knee Compression
I use a soft knee compressor to control pretty much all of my audio.
To do this, I dial in -2dB of compression and then bring it back up to volume using the make-up gain.
This controls the dynamics well and the compressor adds a nice tonality to the audio.
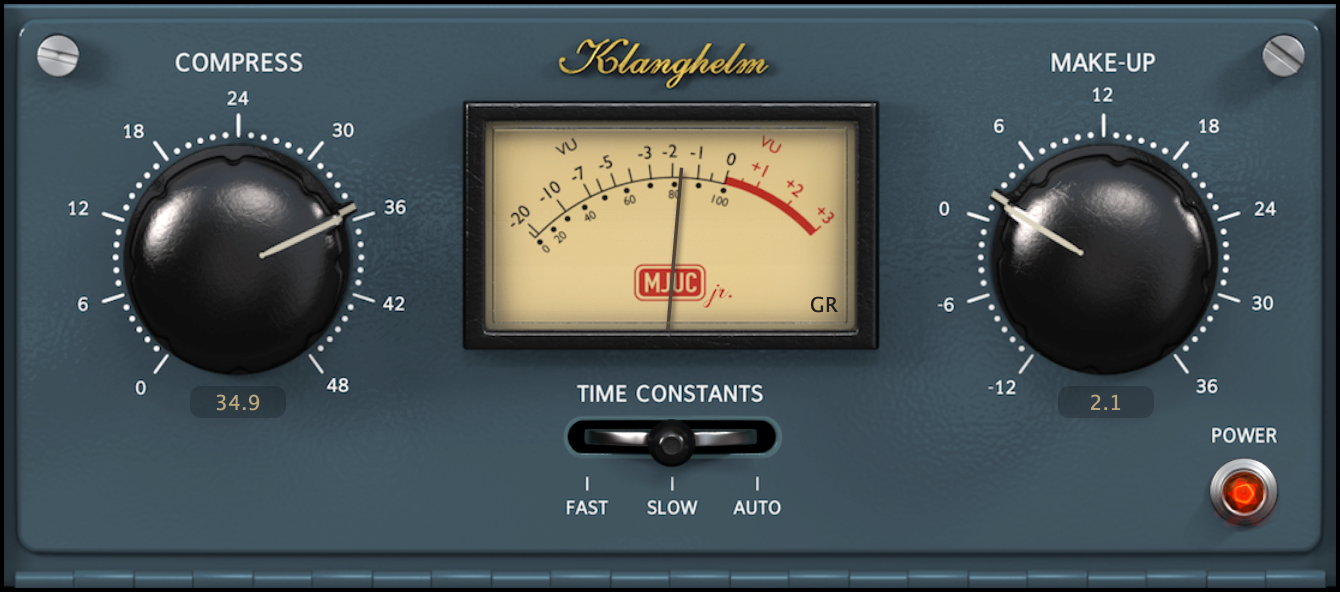
I use the ‘Klanghelm MJUCjr’ compressor, which you can download for free here - https://klanghelm.com/contents/products/MJUCjr.php
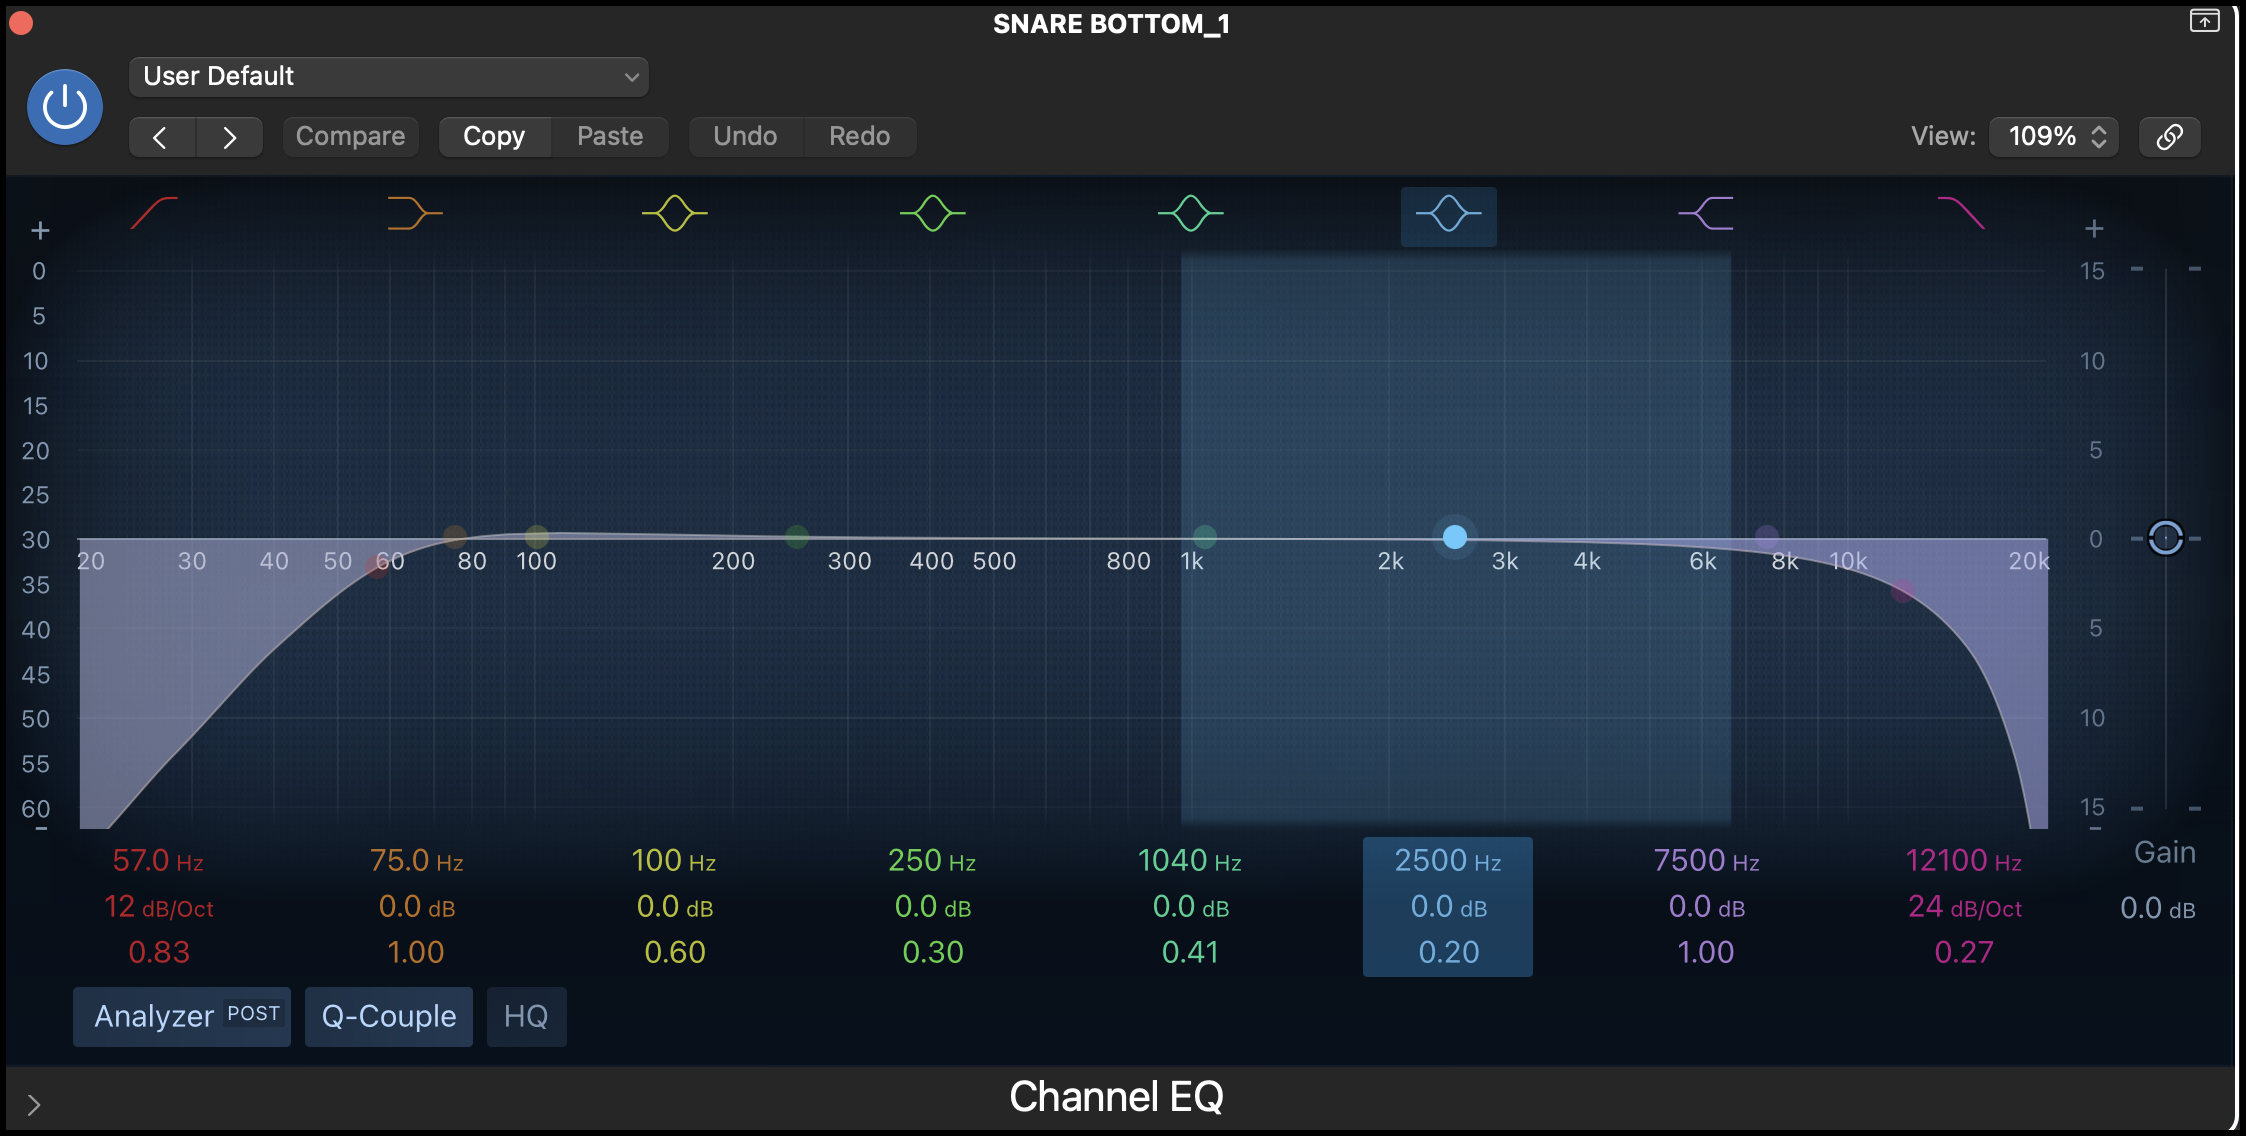
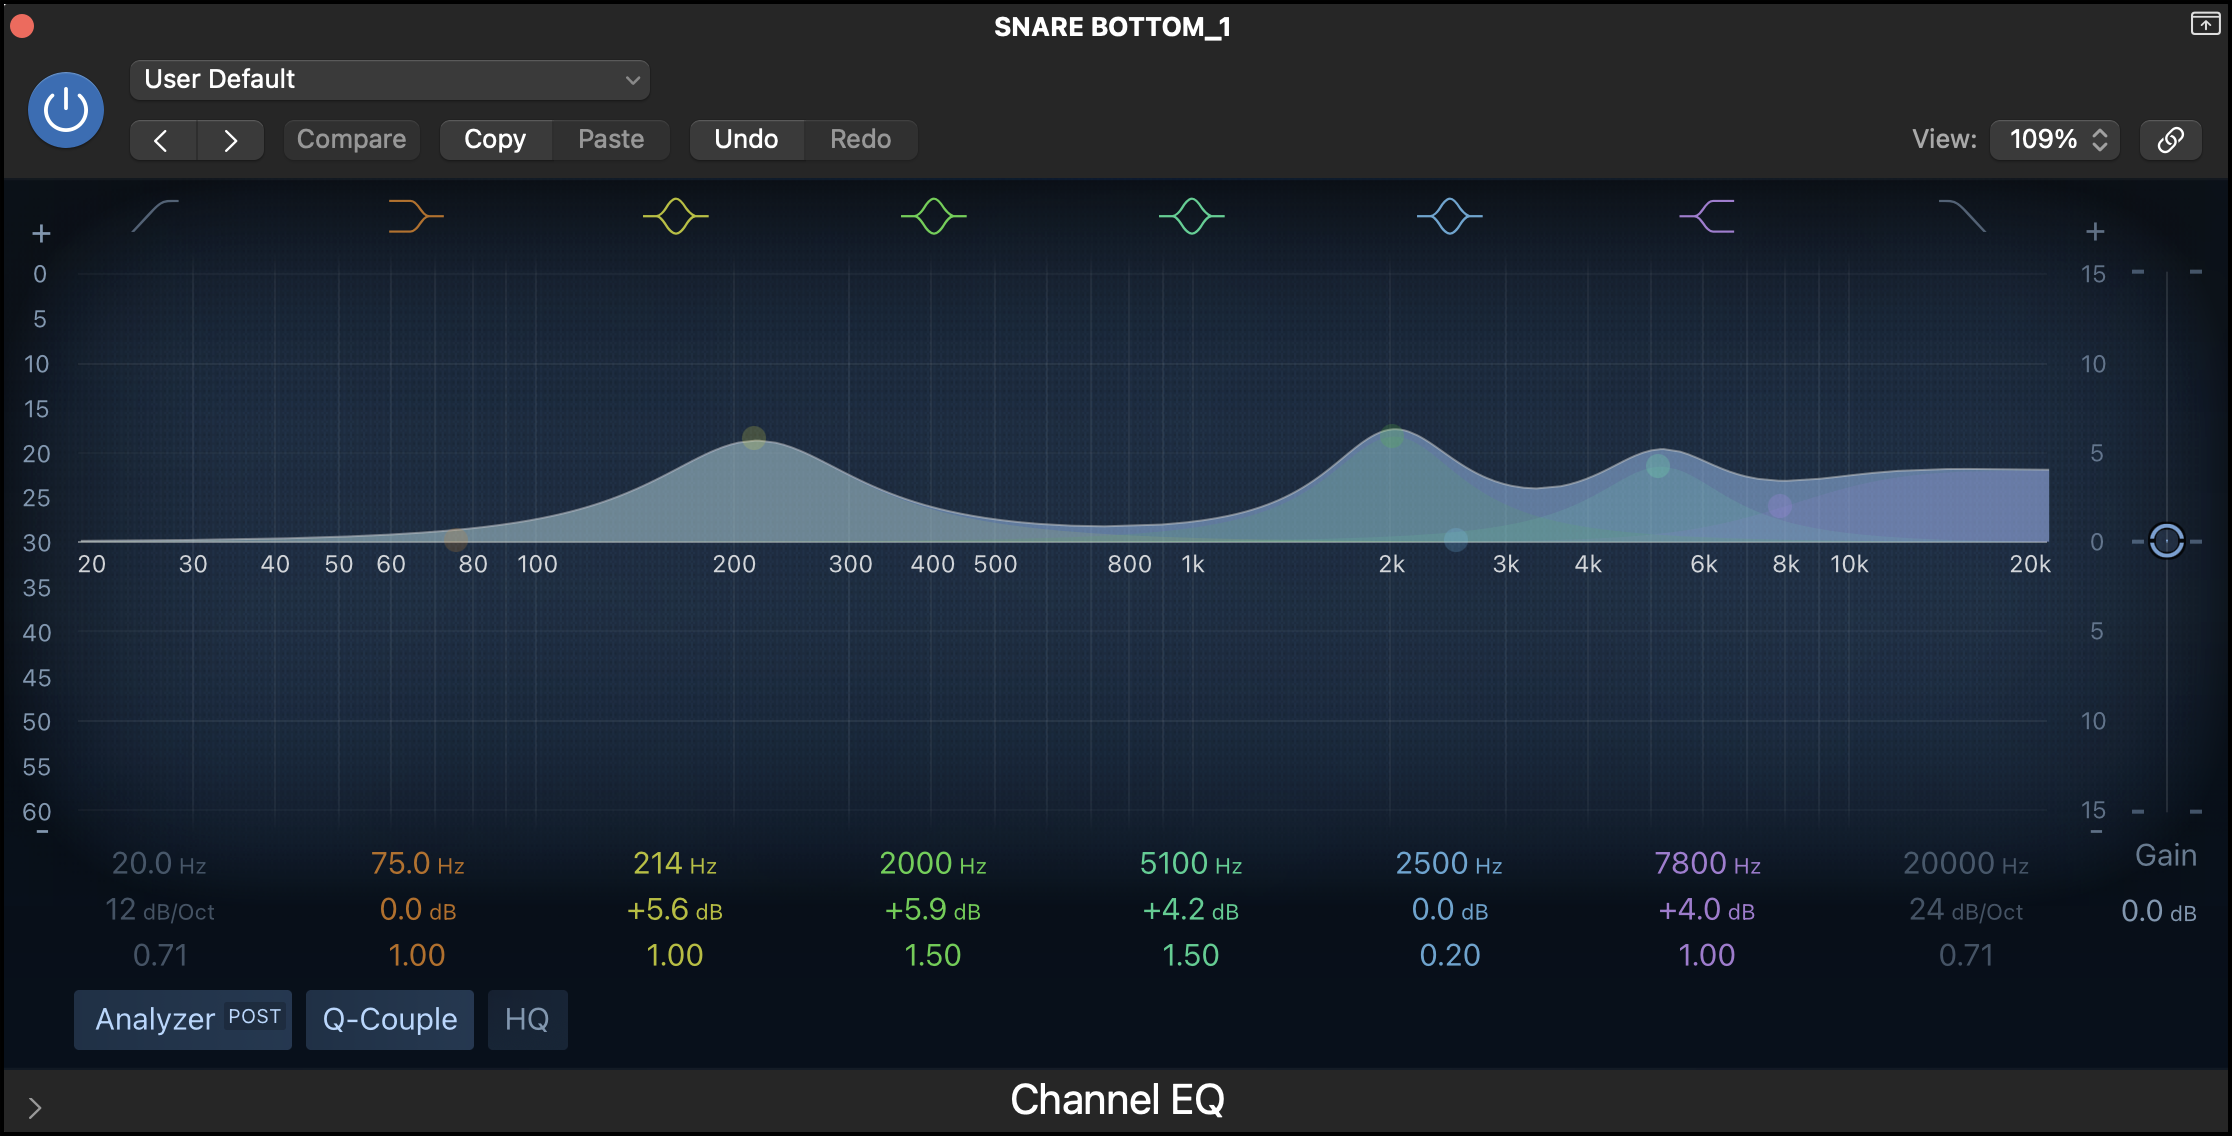
Equaliser (EQ)
After compression, I use another EQ to colour the audio source.
For example, on this bottom snare mic I added:
- 5.6dB at 214Hz to bring out the body/pulse of the snare.
- 5.9dB at 2000Hz to bring out the smack/crack of the snare.
- 4.2dB at 5100Hz to bring out the sound of the wires.
- 4.0dB at 7800Hz using a high self to bring out the head/brush sound.
Sign up for Aux today and claim your free 10GB of storage and start collaborating.
Mixing Sessions
Each session should take a few hours to a day's work.
Stop mixing once you have finished a session or you feel tired, ear fatigue can ruin a mix.
Session 1
Mix preparation, Navigation, and Gain staging.
On every audio track, add an EQ (for filtering), a compressor (for dynamic control), and an Eq (for adding colour).
Session 2
Do a rough balance of audio using faders. Bounce together any tracks that can be sub-mixed, such as backing vocals.
Read about sub-mixing here - https://www.izotope.com/en/learn/5-approaches-to-submixes.html
Tip: Each time you do a bounce save the session so that if necessary you can re-bounce later.
Session 3
Go through all the audio tracks and apply EQ filtering and soft knee compression where necessary.
Now that the tracks have been processed, adjust your balance.
Session 4
Mute all the tracks except for the drums, vocals, and bass.
Work on the balance between these tracks using mainly the faders but also adding any additional processing or effects that will help the balance, such as EQ (for adding colour/filtering) or a Side-Chain on the kick and bass.
Session 5
Bring in the other tracks to fit with this fundamental balance.
You may need to make small adjustments - but essentially the balance between drums bass and vocals should now be kept as is.
If sounds are getting in the way of each other or masking the vocal, add EQ to help achieve a better balance.
Add effects, parallel compression, and automation where necessary.
Session 6
Add reverbs and delays to sounds that need them.
Listen. Compare to reference. Look for ways to improve.
Leave the mix for a day or two.
Session 7
Listen. Compare to reference. Look for ways to improve.
Finish the mix to the best of your ability.
Tip: Remember to leave headroom for the mastering engineer.
Don’t understand headroom? Read about what headroom is here - https://flypaper.soundfly.com/produce/how-to-create-headroom-7-tips/
When mixing, the most important thing to remember is there is not a one size fits all approach.
You will never be able to read an article on mixing and then innately know how to mix.
You need to use your ears.
If you use the knowledge I have shared here, alongside your most important tool -your ears, you will be able to create a well balanced and professional-sounding mix.
Look out for part two of this article where I go into detail about some creative mix techniques. I’ll cover Serial Compression, Side-Chaining, Parallel Processing/Auxiliary Channels, and effects such as reverb and delay.
All of which will take your mixes to the next level.
Thank you for reading,
Sky-Maya Groom.